Knowledge Base – PhoPrint Support
1. Open Sparkbooth Settings
2. Open Start Screen Settings
3. Open Camera Settings
4. Toggle fullscreen
5. Open Activation dialog
6. Toggle lock mode by pressing and hold corner. Turning lock mode on will hide the toolbar, disble any keyboard shortcuts to open any settings, and prevent exiting fullscreen. You can also use ctrl-L (command-L on Mac) to toggle lock mode.
7. Photo previews thumbnails. Shows how many photo will be taken, and displays a thumbnail of photo as they are taken.
8. Video screen. Video preview of what will be photographed.
9. Resize window handle. In window mode, use this handle to resize the window.
You can display the Start Screen Settings by pressing the Start Screen Settings button on the toolbar, or pressing ctrl-2 from the Start Screen. Use these settings to configure what is displayed on the Start Screen and to change the theme.
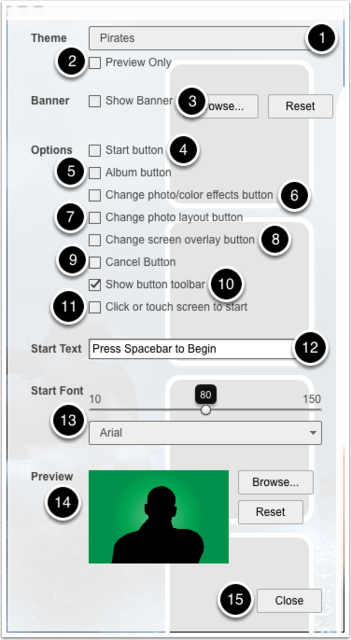
1. Change background theme
2. Show or hide thumbnails
3. Display and select banner image
4. Display start button
5. Display album button to open album view to browse previous photos.
6. Display change photo effects button. Allows guests to change photo effects (color, sepia, black & white, fomomatic). Go to Settings > Photo Effects to configure selectable effects.
7. Display change photo layout button. Allows guests to select photo layout to use. Go to Settings > Photo Layout to configure selectable photo layouts by favoriing layouts using heart button.
8. Display change screen overlay button. Allows guests to select screen overlays to use. Go to Settings > Screen Overlays to configure selectable screen overlays.
9. Display cancel button during photo session to cancel session.
10. Display toolbar
11. Enable click or touch screen to start photo session.
12. Change start message or start button text
13. Change start message font and font size
14. Change portrait image used for photo layout preview
15. Exit Display Settings
You can display the Camera Settings by pressing the Camera Settings button on the toolbar, or pressing ctrl-3 from the Start Screen. Use these settings to configure the webcam.
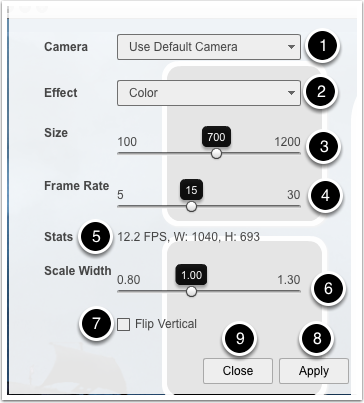
1.Change webcam
2.Change photo effect
3.Change video / photo size (height)
4.Change video frame rate
5.Video stream attributes
6.Scale video width (Mac only)
7.Flip video vertically
8.Apply video / photo settings
9.Exit Camera Settings
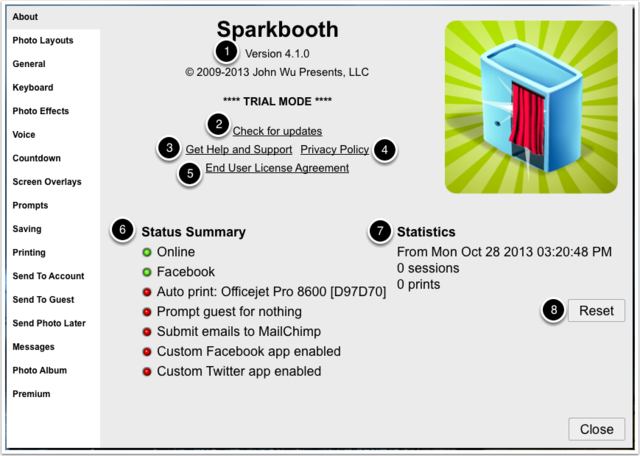
1.Version information
2.Check for updates. If an update is avaialble, you will be able to download and install the update.
3.Takes you to the Sparkbooth support site
4.View privacy policy
5.View end user license agreement
6.Status summary including online status, send to account uploader configured and ready, printer enabled, prompts for guests, MailChimp ready, custom Facebook and Twitter app configured.
7.Photo booth statistics including start date, number of sessions, and number of prints.
8.Reset button for statistics [Premium license only]
You can get the spare parts (papers) from us or from your local market if they are available there.
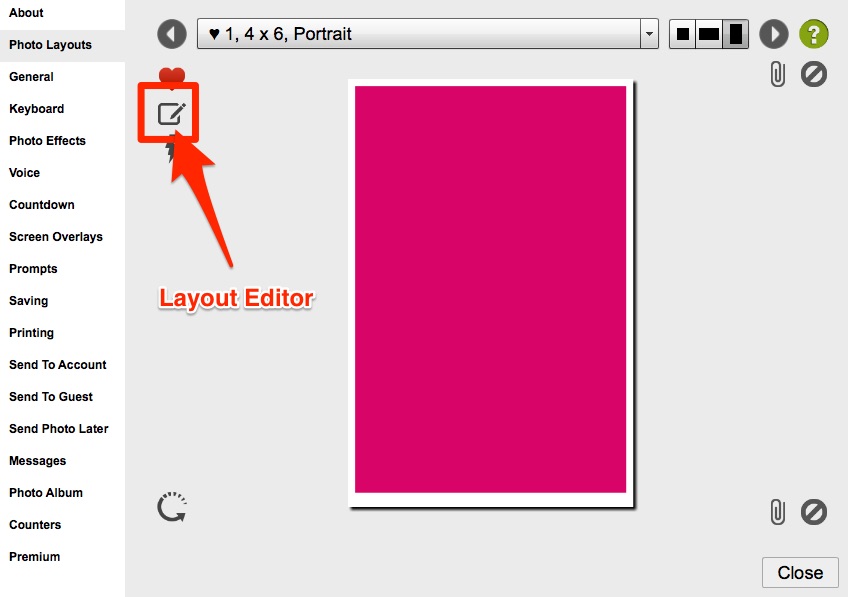
Use Photo Layout Settings to set the photo layout to use and to access the Photo Layout Editor
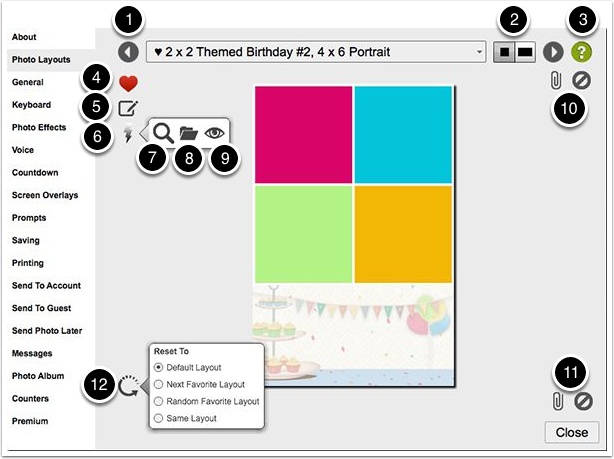
1.Select from list of photo layouts
2.Filter photo layouts by square or widescreen photos [Widescreen is Premium license only]
3.Go to Help
4.Toggles favorite state of photo layout. Favorited photo layouts are sorted to top of list, and are selectable from start screen if you have the select photo layout button displayed or keyboard shortcut enabled.
5.Go to Layout Editor to customize photo layout, or create a new photo layout. Creating new photo layouts requires Premium license.
6.Actions
7.View photo layout preview image in default image viewer. This is useful if you want to save the preview image to use as a template.
8.Import Sparkbooth layout file (sbl extension) [Premium license only]
9.Photo layouts list to quickly set favorited, hidden, or deleting
10.Attach or remove overlay image to photo layout. Only gif or png image are allowed since they can have transparent backgrounds to let photos show through.
11.Attach or remove background image to photo layout.
12.Reset photo layout settings. Allows you change the photo layout automatically for next session.
Default Layout. Always reset to the selected layout
Next Favorite Layout. Select the next favorite layout.
Random Favorite Layout. Select a random favorite layout.
Same Layout. Use the current user selected layout.
The Photo Layout Editor is used to customize photo layouts with text and graphics. If you have a Premium license, you can use the Photo Layout Editor to create your own photo layouts by adding, positioning, resizing, and rotating photo placeholder.
To access to the layout editor, go to Settings > Photo Layouts > click on the Layout Editor icon button
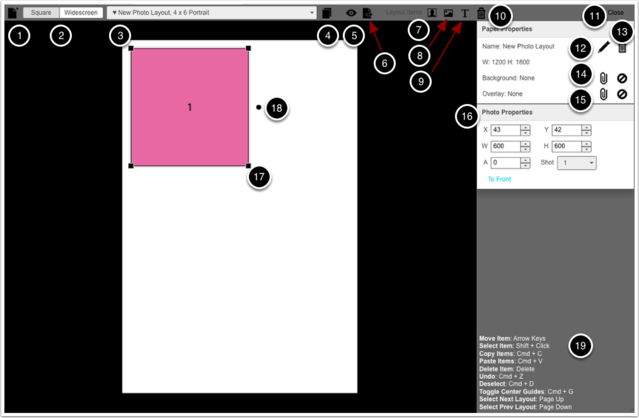
1.Create new empty photo layout [Premium license only]
2.Filter photo layout drop down list by square / widescreen / portrait photos. [Premium license only]
3.Selects photo layouts from list. Read-Only photo layouts cannot be edited. You can customize read-only photo layouts with custom text, images, backgorunds, or overlays, but you cannot change the position and size of the photos. [Premium license only]
4.Clone selected photo layout. Creates a copy of the selected photo layout which you can now customize. [Premium license only]
5.Generate preview of photo layout and view in your default image viewer.
6.Export photo layout. Generates a SBL file (i.e. Sparkbooth Layout) that you can import into Sparkbooth on another computer. [Premium license only]
7.Add photo onto photo layout that you can position, resize or rotate. [Premium license only]
8.Add image/graphic onto photo layout that you can position, resize or rotate.
9.Add text onto photo layout that you can customize, position or rotate.
10. Delete selected items (photo, image, or text)
11.Closes Layout Editor and goes back to Photo Layout settings
12.Rename photo layout. [Premium license only]
13.Delete photo layout. [Premium license only]
14.Attach or remove background image
15.Attach or remote overalay image
16.Select item properties. Used to fine tune control positioning, resizing, or rotation of selected item.
17.Resize selected item.
18.Rotate selected item.
19.Keyboard shortcut help
1.Go to your computer’s Control Panel > Devices and Printers
2.Right-click the printer and set it as the default printer
3.Right-click the printer and select Printing preferences to setup the printer’s default paper size and other settings
4.Open Sparkbooth, and press F1 to display the Settings dialog
5.Select Printing options
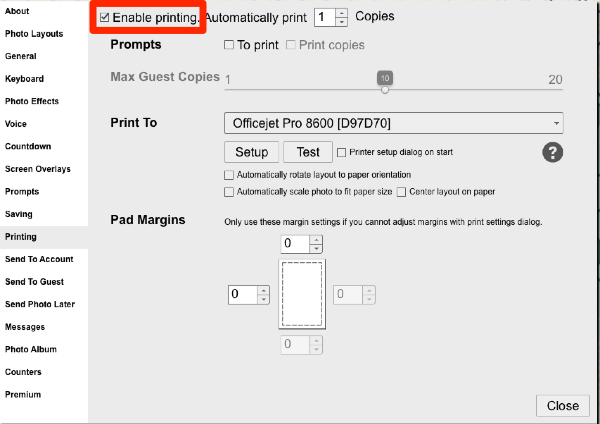
6.Check “Enable printing” if you want to automatically print within each session
7.Select the printer from the drop down list
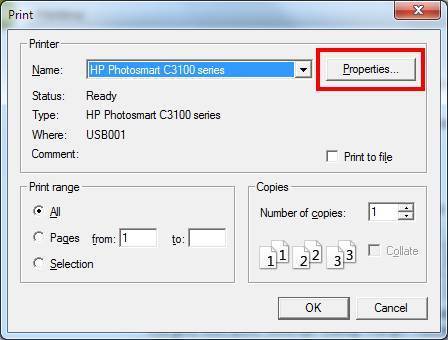
8.Press the Test button. This will display the print dialog. Select the printer and press Properties to verify the configuration. When you are done, press the OK button to print a test layout. If you do not want to print a test layout, you can turn off the printer and delete the print job from the printer queue.
If you are still unable to print, it means your printer may have specific settings that cannot be set to default through Control Panel. You may have to setup the printer each time you start Sparkbooth:
1.Go to Sparkbooth Settings
2.Select Printing options
3.Press the Setup button to display the Setup dialog. In the dialog, select the paper size. Press OK to close the Setup dialog
4.Press the Test button to display the Print dialog. In the dialog, make sure the your printer is selected, and you can set the other printer specific settings in the Properties button. Press Print to test the setup.
5.Check the option “Always Print with Current Settings” if the printer dialog has it. If not, these printer specific settings cannot be saved and reused in between re-starts, so you will need to repeat these steps to re-setup the printer when starting Sparkbooth.
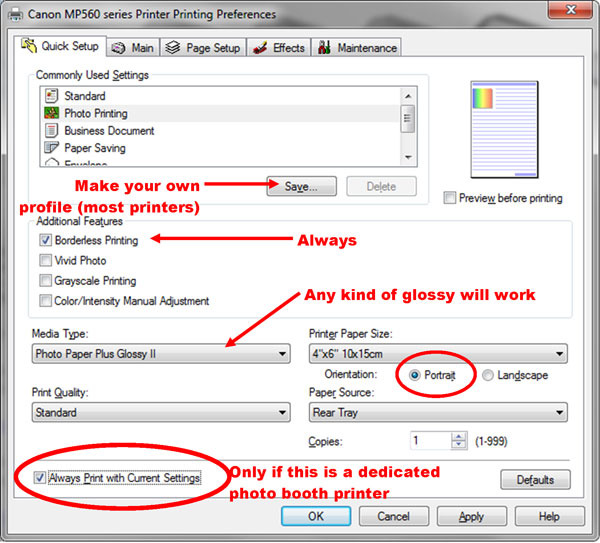
6.Also try toggling the “Automatically scale photo to fit paper size” and/or “Center layout on paper” options in Sparkbooth printing settings.
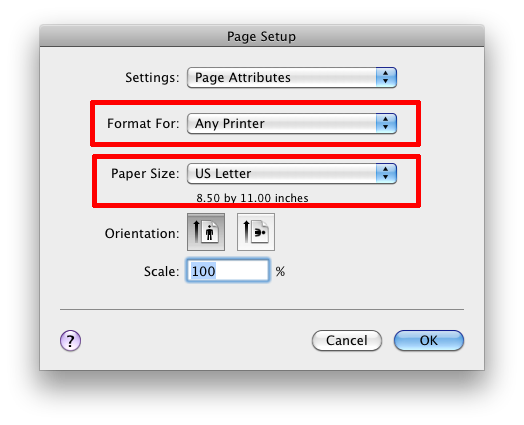
To setup printing on a Mac OS X for “4 x 6 photo paper”. You will want to setup all the printer settings as default through the Printer system preferences, since the settings through the Test and Setup buttons in Sparkbooth do not save inbetween application re-starts.
1.Open Sparkbooth, and press F1 to display the Settings dialog
2.Select Printing options

3.Select the printer from the drop down list
4.Check “Enable print” if you want to automatically print each session
5.Press the Setup button to display the setup dialog, and select the printer and paper size
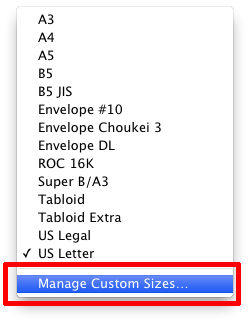
6.Your printer does not have an option for 4 x 6 paper (it could be named something else), select “Paper Size” and then “Manage Custom Sizes”
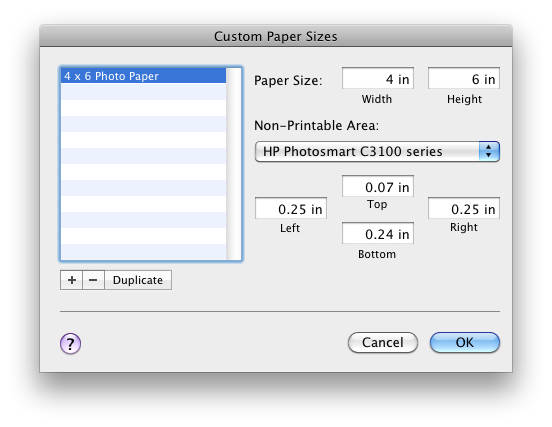
7.Press “+” to add a custom size for 4 x 6 photo paper
8.When you have completed this, press OK and close the Settings dialog
9.On Mac OS X, set the default printer and paper size in System Preferences > Print & Scan (or Print & Fax)
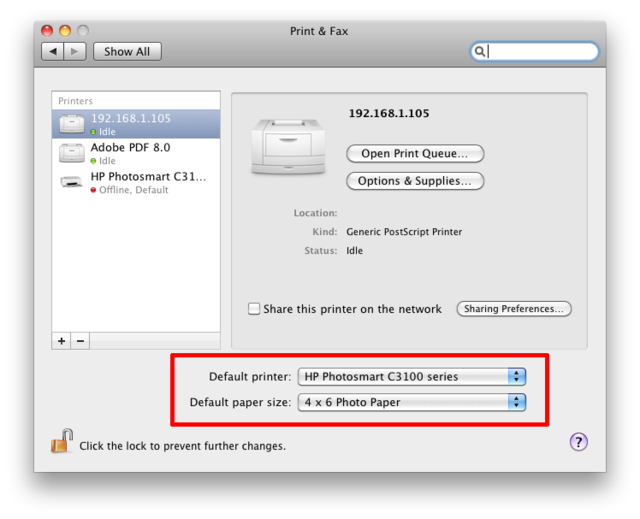
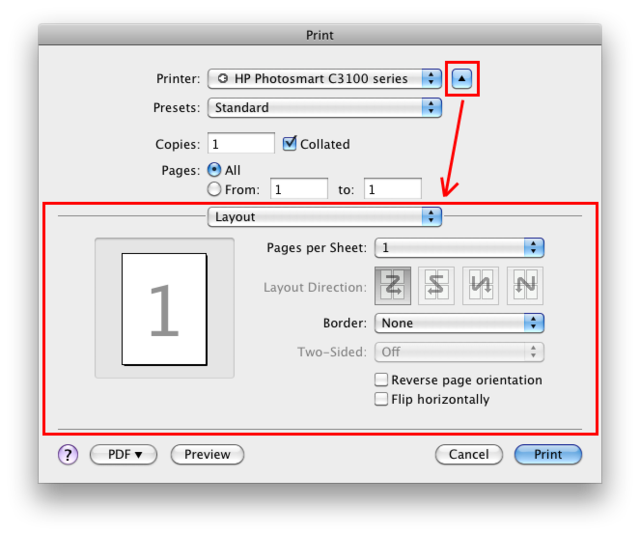
10.If you need to configure other printer settings that were not available in the printer setup dialog, go back to Sparkbooth Settings > Printing options and press the Test button. This will display the print dialog. You can press the down arrow next to the selected printer to display printer specific settings. After you have finished, press Print to save the settings. If you do not want to print a test layout, you can turn off the printer and delete the print job from the printer queue.
If you are still unable to print, it means your printer may have specific settings that cannot be set to default through System Preferences. You may have to setup the printer each time you start Sparkbooth:
1.Go to Sparkbooth Settings
2.Select Printing options
3.Press the Setup button to display the Setup dialog. In the dialog, select your printer and paper size. Press OK to close the Setup dialog
4.Press the Test button to display the Print dialog. In the dialog, make sure the your printer is selected, and you can set the other setting specific to your printer. Press Print to test the setup.
5.These printer specific settings cannot be saved and reused in between re-starts, so you will need to repeat these steps to re-setup the printer when starting Sparkbooth.
6.Also try toggling the “Automatically scale photo to fit paper size” and/or “Center layout on paper” options in Sparkbooth printing settings.
You an enable Sparkbooth to automatically print photos during a photo session by following these steps:
1.Press F1 to display Settings
2.Select the Printing options
3.Check “Enable print”

These printers have been recommended by Sparkbooth customers. Please do your own investigations before purchasing a printer, everyone has different opinions and printer needs. If you have any other recommendations, please let us know.
For Dye Sub Printers
DNP RX1
Hiti P510
For General Printers
Epson R230 or R290 and Epson T60
Mitsubishi CP-9550DW
Mitsubishi CP-9810DW
Canon Selphy ES1
Canon Pixma IP4700
Sony’s Snaplab
For Compact Printers
Canon SELPHY CP910
Canon SELPHY CP900
Canon SELPHY CP800
Canon SELPHY CP780
Kodak 3200 AIO
Kodak 3250 AIO
EPSON PictureMate Charm PM 225
Epson Artisan 50
For Continuous Ink Supply Systems (CISS)
Epson Artisan 50 with a CISS system
Canon PIXMA iP4920
If you are seeing a “Printer error” notification when printing from Sparkbooth, it could be a number of issues”
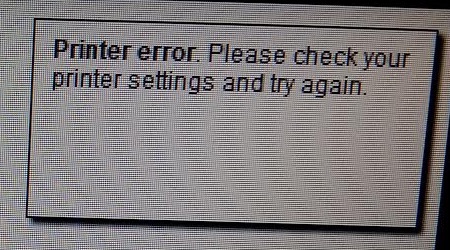
1.Verify the USB printer is plugged into the same USB port. Some printer drivers require that the printer be plugged into the same port. Plugging the printer into a different port will create an new instance of the printer on the printers list, so it will be sending the print to the wrong port.
2.Try disconnecting unnecessary USB devices to minimize USB usage, or if using a USB hub make sure the power adapter is plugged in. Too much power is being drawn from the USB ports causing the devices to temporarily disconnect.
3.Try using the “Windows Viewer” print setting to see if that resolves the issue.
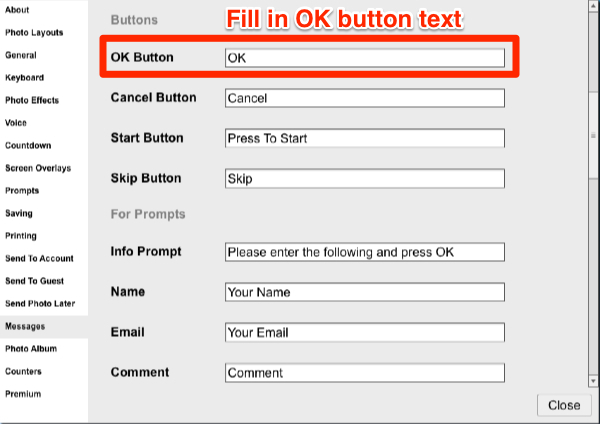
If Sparkbooth is not printing for you from the Print Prompt, it could be that the OK button for printing is hidden. You can display the button by checking that the OK button text is filled in. Go to Settings > Messages > Buttons and fill in the OK Button text field.
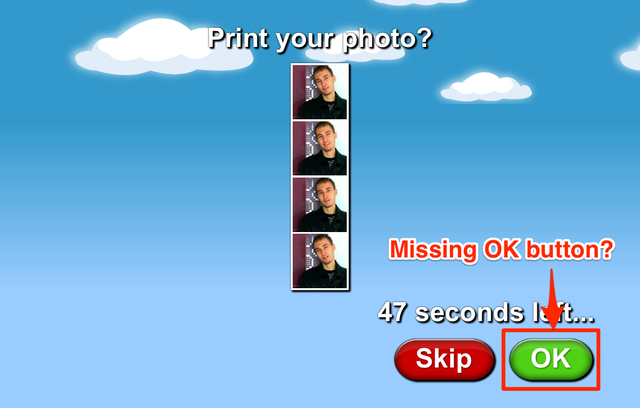
Note: If you can also trigger printing from the print prompt screen, by pressing the enter key on your keyboard.
Our machine now supports the coin and banknote, as we have sent machine to Bulgarian before, so I guess we can handle it to do the price programming remotely after you receive the machine, but it requires your assistance while we doing the programming. But if you have concern, then it will be better to send us some test small money.
No, our software doesnt suppport giving back change, but the price is settable in the backend admin.
Yes, we use NV10 bill acceptor which is imported from UK, and it can recognize fake money and reject it.
It depends on what software you selected, we have two softwares, one is more focus on the advertising display on the screen, another is more on the photo printing enjoyment.
So pls kindly tell us your plan for the machine first, then we can do recommendation accordingly.
So far we have video ad screen it is not used, but it can be still screen if not being used.
You can enjoy discount when you reach 5 pcs. You can order it directly from us, (we sending you invoice with order details and bank info, then you tansfer money to that account) or you can start an order from our alibaba website where you can enjoy trade assurance as well.
Life time software warranty ( if provided by us) and one year hardware maintenance.
The instagram photo kiosk can be used in any kind of public streets, resturants, shopping malls, hotels, restuarants , tourist spots and amusement park or theme parks etc.
- You can charge money for advertising and photo printing.
- The machine can be used for rental or resell as well.
We can send you the printed samples, but the shipping cost needed to pay on your side. If so, pls tell me your details address and we check how much for the shipping.
The machine we send you is in complete set.
The typical maintenance might be the fuse, it might be burned for disapproperate operation.